10 Good Reasons To Use Hard Solder
For All Your Solder Joints!
1. Hard solder actually becomes easier and quicker to use  than the "step" method. No hat trick, just controlling your torch, all my students can do that easily with in the first 30 minutes of learning to light a torch. This includes junior high age students. By using only hard solder there is no reason to ever have to "tie" your pieces together with "bailing wire", oops, I mean "binding wire". I have not used it in 25 years, and can not imagine a sitution that would require it. Hard solder will hold every thing in place while soldering. Saves time, more profit. In the same time it takes to try to tie something in place you can have it soldered.


2. Because hard solder polishes and ages just like sterling silver, you can use a lot of it to fill gaps, so there is no need to waste time getting every solder joint to fit just perfect. This insures that the  customer gets a quality piece that takes less time  to make, so more profit!


3. Hard solder polishes just like sterling, wears just like sterling, and tarnishes just like sterling, unlike easy and medium that begin to oxidize, tarnish faster than sterling. If you like unsightly darkened solder lines then use easy and medium.


4. Hard solder will not undercut as easy and medium solder will. I have had many repair jobs come in (when I did repairs for about 5 years) with solder lines on polished surfaces that were polish in to unsightly grooves. They tarnished, began to show, so they were polished and repolished to the point that the solder joints began to undercut, the solder eaten away. Then the sides of the sterling begin to get buffed and the result is a rounded groove where the joint is.


5. There are only three solder grades, some time in every piece you make, multi joints must be made with the same solder. All I am trying to teach is the more joints you make with hard solder the easier it is to do the piece. As soon as you begin to use medium or easy, you make it harder do make the next solder joint with out something bad happening.  Doesn't this just make sense. If you use hard solder for nearly or all solder joints, it is actually easier to control the temperature of the piece and not harder.


6. The real proof that using only hard solder is easier to use, all my students use the $10.00 propane torch to learn with. Then as they sell jewelry and make a good profit, they can pay for a better torch.


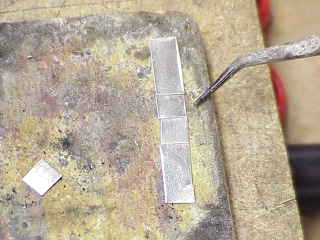
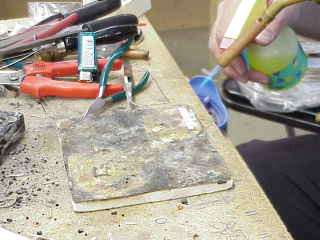
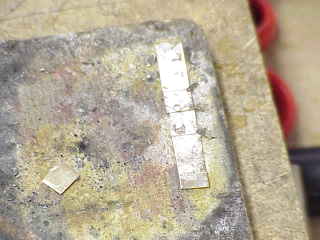
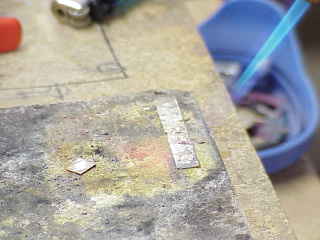
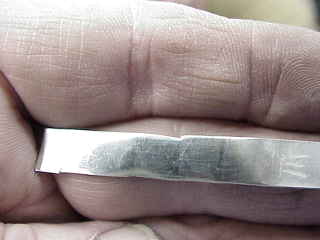
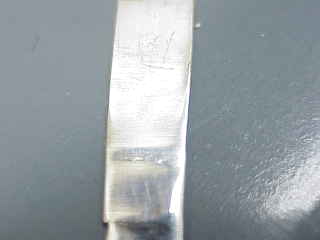
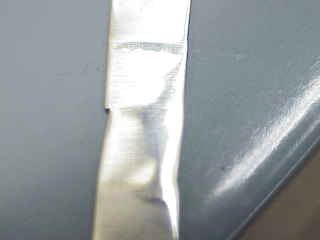
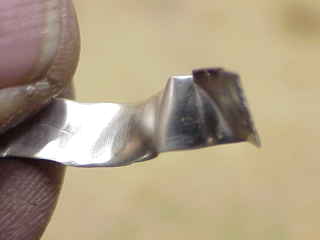
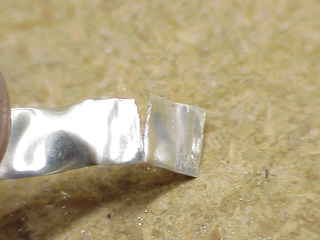
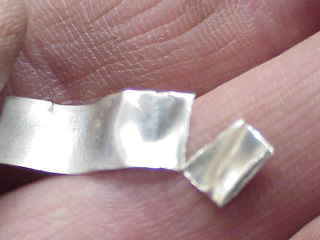
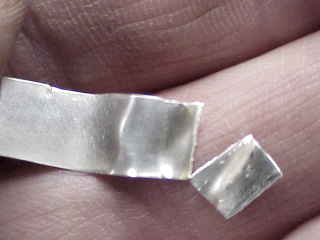
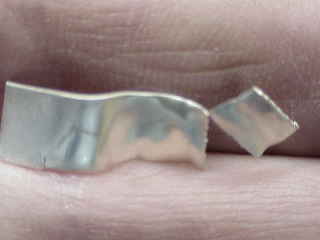
7. Hard solder does not pit as medium and easy do. See the photos below.


8. Faster to use, which means to most fabricators, more profit! I teach my students they do not have time to dork around using three solders. In the time it takes to decide which one to use where, they can have it soldered and finished.


9. If a piece gets ran over by a car, the poor slob that must repair it, will not have fall completely apart as he, or she, heats it up. The piece will be easier to repair! That's a  good thing, for the person doing the repairs and the customer!

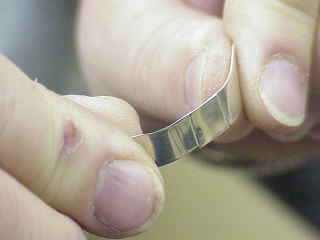
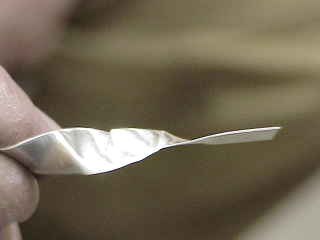
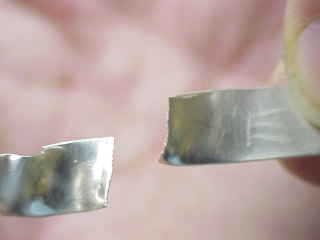
10. Hard solder makes stronger solder joints. If you want to know why joint the Silversmithing List and ask. The answer is simple and will makes sense to you. See test below.
Solder Test
To test the strength of the three grades of solders, I performed the following test in one of my silversmithing classes for my students. I was a little shocked at the results. I had just told them that "The sterling silver would break before any of the solder joints, therefore, worrying about which solder to use for the sake of strength was unnecessary." After this test I had to eat those words and admit that
I was wrong!
Darn, I hate to have to do that!
I took a 5/8 inch wide by about 2 1/2 inch long strip of 26 gauge sterling silver sheet. Cut it in to 4 pieces. I aligned them on a Solderite pad.
After marking the solder joints with an "E" for easy and a "H" for hard, I fluxed the piece with Battern's Self Pickling Flux.
I placed solder on the bottom edge of each joint.
By the way I always use nothing but sheet solder for everything, except for one style of ring I make. Of course I have good reasons for this if you use wire solder, you should not! You are loosing profits, and you should take my Online Beginning Silversmithing Class. Actually you do not need to take the entire class to learn why. Just email me and ask for the first four lessons with no obligations.
I heated the piece to the point where the hard solder flowed first, then the medium and the easy, to duplicate the step method..
After pickling the piece in cold pickle, because I almost never use heated pickle. I polished the front and the back of the piece.
As you can see the easy solder joint was full of pits.
The medium solder joint had few pits than the easy, but still had noticable pits.
The hard solder had no pits, and it was impossible to determine where the solder joint was.
We began to bend and twist the piece. Notice that you can see the easy and medium solder joint on the back of the piece. I polish it enoug that they began to under cut.
As we bent and twisted the piece we tried to count the bends and twists. This was difficult because some students bent and twisted it at the same time. This photo was taken after about 10 bends and twists.
Then, at about 23 to 25 bends and twists, I got my first surprise. The easy solder joint broke! I really thought that all solder joints were stronger than the sterling silver it self.
There was no sign of breaking at the medium or hard joints.
But then in about 5 or 6 more twists and bends (about a total of 30) the medium solder joint began to tear loose and break! I was shocked!
The hard solder joint had no signs of weakening.
About 8 more bends and twists (about fourty total) the sterling silver broke about 1/2 between the hard solder joint (a notch was left on the bottom edge to know where it was) and the medium joint.
The hard solder joint had no signs of weakening!
I hope this answers those that critize my methods of teaching to use only hard solder for every solder joint. If you are not, you are not giving your customer the best piece of jewelry that you could. If you are still using the step method this is what you are giving your customer.

1. Pity solder joints, unless you take the time to fill them in with another solder operation. If so you are loosing profit!

2. Solder joints that will tarnish and turn black quicker than the sterling. This is not very pretty, especially on highly polished flat surfaces or corners of  hollow pieces.

3. Solder joins that may break.

4. Then, after they break, you will give poor repair person an "oh S***" moment" because they have to fix your piece of junk, using easy solder for the repairs. So they have to deal with pitting of their repair work, that is if the whole thing does not just fall apart and they rebuild the whole piece.
(Classes)  (Silversmithing)  (Video Classes)   (Turquoise)  (Pewter)  (Sculptures)  (Stones)  (My Bio)  (My Other Sites) (Private Classes) (Rock Wraps)  (E-Mail Me)  (Spot Price)  (Contact Us)  (Tool Kit)  (Links)  (Student's Comments)
(World"s Largest Art Show) (Home)  (Small Castings For Silversmithing and  Metal Clay)